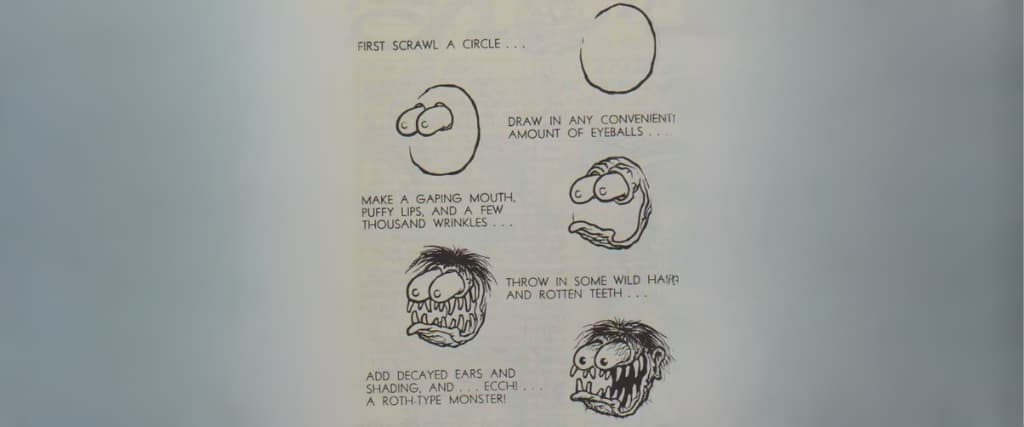
The drawing tool discussed below is excellent for students. There will be six pages of monster drawing for trainees to make their monsters. Besides, students will see how to draw each part of the monster, making it perfect for art classes.
This guide has highlighted 5 Monster Roll & Draw Pages that will keep trainees engaged as they experiment with different combinations. With the roll-and-draw sheets, students are tasked with designing new monster components. Making new monster components is challenging! Roll and draw papers are an excellent addition to any drawing center.
Each Monster Roll & Draw Page has an additional page illustrating “How to Draw” instructions with the same options for trainees to choose from without rolling the dice. These papers will be helpful if you want to use less paper and only give your students one page. Also, remember that you may as well have a project idea.
Step 1: Start With the Head
This monster drawing tutorial will start with the creature’s head. Draw a curved line for the top of the head to start. Next, draw two horns with waves from the top of the head.
Step 2: Draw A Body For Your Monster
Your monster drawing needs a body, so let’s make one in this step. Since the monster to be drawn has a long, skinny body, you’ll start by drawing a line that curves down from its head.
This curve should line up with the head, but you should leave a small space between the head and the body because the arms will go over these spaces in the next step.
Step 3: Add Some Arms For Your Monster
This monster wouldn’t be terrifying enough if it didn’t have big, scary arms, so this step of how to draw a monster tutorial will focus on these parts.
The arms will fill the spaces between the head and the body that you made. The arms will move down toward the body’s base, where the legs start.
But you could make them much longer if you wanted to! Ensure the monster’s hands have big and sharp claws.
Step 4: Create A Scary Face For Your Monster
A monster’s appearance will heavily depend on how scary its face looks. So, in this step, you’ll make a scary face on your drawing.
The two most essential parts of a monster’s face are its eyes and mouth. Let’s start with the eyes. Give them a sharp angle on the sides to make them look angry.
You can also draw some lines for the eyebrows. This will only make it look angrier! Then, draw a curved line with a few dots below it for the nose.
In this last step, make a monster’s big mouth. The inside of the mouth is drawn with jagged lines to make it look like it has sharp teeth.
You can also change how your monster’s face looks to make it look different.
Step 5: Draw Some Details For Your Monster
Now that you’ve finished this tutorial on how to make a monster, it’s time to give your monster some finishing touches.
You’ll learn what you can do, but don’t be afraid to add your ideas!
For this illustration, people gave the monster’s arms a few short lines to make them look rougher and hairier.
A few extra lines on the body add some detail and finish this step.
Step 6: Draw Some Legs For Your Monster Drawing
Before you start coloring your monster, let’s give him some legs to stand on. In this design, the arm’s length will be much longer than the length of the legs.
Add jagged lines to the toes to make them look more dangerous and rough. This will make it seem like they are scarier.
Now that you’re done with this monster design, you can draw any changes you think are needed before moving on.
You can put your spin on this picture in many ways, like changing it, adding details, or even drawing a great background.
Step 7: Finish Off Your Drawing With Some Color
In the last step of this tutorial on how to draw a monster, you’ll learn how to use color to let your imagination run wild.
In this drawing, brown was the primary color, with some darker tones added for details.
Folks decided on these colors for the decorations, but this is the part of the process where you get to show off your fantastic sense of color. This is your picture of the monster, and you can use any colors you want for it.
You can choose more natural and muted colors or ones that are more bright and bold.
It could be a monster that lives in a swamp and is green, a beast that lives in lava and is red, or a snow-beast that lives in the snow and is white and blue.
You can also get some great looks for your drawing by using fun art materials to color it.
You should use acrylic paints and colored pens if you want your monster to have bright colors that stand out. Watercolors and colored pencils, on the other hand, will give your monster a more subtle and soft look.
More Ways to Make Your Monster Drawing Unique

Use these four simple and fun ideas to make your scary monster.
Monsters in movies and books usually have a lot of scary qualities. These can be made from horns, spikes, or even several rows of sharp teeth.
Remember, these are just a few things you could add to this monster design to make it more interesting. Even though it has a few horns, you can make them bigger to make it look scarier.
If you wanted to, you could also give him big yellow eyes or scales that cover his whole body. These are some ideas, but what else could you add?
You can make this sketch of a monster more personal by adding some details or a background, whichever you prefer. In this step, you can use your imagination to make a more exciting drawing.
You can show with canals that the monster is hiding in a dark cave or going through a poor town. If you want to, you can also get ideas from monster movies you’ve seen in the past.
Where do you think you might find this animal, and what places does it like to hang out in?
This monster picture has a design that should look great, but you can change it any way you want. As soon as you get the hang of drawing, you can start changing the parts to make your design.
The shape of the head or body could be longer, but it could also be shorter. You might want to make its mouth big or its legs bigger than its arms.
Since this activity aims to make your monster, how you finish drawing it will depend on your creativity.
You can also make your work look unique by getting creative with your mediums. You’ve learned one or two ways to color this sketch of a monster, but you can let your imagination run wild with the rest.
You don’t have to stick to the usual tools and materials for art, either. You could also put crafts on this page to make it stand out from others.
You could, for example, cover the monster in a thin layer of glue and then add dirt or glitter to give it more texture.
Final Thoughts
This guide on how to draw a monster step by step is now done.
You can see a scary monster on this page now that you’re done reading this guide.
Following simple steps will surely make this drawing more straightforward than you thought it would be.
Drawing your monster is part of the fun, but now it’s up to you to show us how creative you can be with it.
You can show us your creativity, like adding fun details, making a great background, or using unusual colors.
Our website is constantly getting new step-by-step guides like this one, so check back often, so you don’t miss out.